Why we recommend Path Signals
In OpenTTD version 12, we changed rail signals building UI only shows the Path Signal types by default. It was implemented in pull request #8688, for those who want to see the development history. This is the one change in version 12 that has by far caused the most questions everywhere, so let’s talk a bit more about it, and show some examples of simple signal setups for path signals.
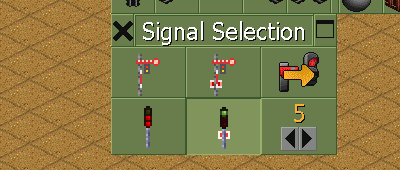
The reason for hiding the block signals by default is to make it easier to choose a signal. For almost all players, path signals are the easier choice, that will cause fewer issues in your network. One question would then be, if path signals are better, why are block signals then in the game? The simple answer is, because they always were there. It was the only type of signal in the original game, and if we removed them, then old saved games would stop working.
As for why path signals are generally better than block signals, the reason is that path signals don’t reserve entire blocks, but only pieces of track. When a train wants to pass a block signal, the train asks the block signal to find all other signals on the other side, and turn them to red. Nobody else can enter this area. When a train wants to pass a path signal, the path signal finds a way to where the train is going, and blocks off (reserves) just those pieces of track. Other trains can still go into the same area, as long as they won’t touch the reserved pieces of track. This means more trains can go through the same area at a time.
There is a myth about path signals, that they slow the game down, or put excessive load on multiplayer servers. This myth comes from a misunderstanding, caused by over-simplified explanations about ways block signals can be better in some special situations. You may have seen the OpenTTDCoop style of hyper-optimised games, where hundreds of trains run in perfect lock-step sync, with very close distances between trains. These train networks are set up using and abusing behaviours of the signals, where block signals release other trains into the block as soon as a train leaves the block. Meanwhile, path signals don’t release a block. Instead the waiting trains need to query the signal for a free path once in a while, and that doesn’t happen every simulation tick. This in turn means a train waiting at a path signal can take a few ticks longer to start running again, than a train waiting at a block signal. And that’s where this myth comes from: Path signals can cause micro-delays in train networks. It’s not that the path signals make multiplayer servers run slower, it’s that in hyper-optimised train networks they can cause micro-delays, which make the train networks less efficient.
So block signals are faster? Yes and no. On a microscopic scale they can be, but they require a lot more care, and it’s much easier to shoot yourself in the foot with block signals. We often see new players asking about how to make a station or interchange work, and then show a screenshot of a setup with very poorly placed signals, that would be much easier to build right with path signals. That’s why we want to guide players, especially new players, to use path signals instead of block signals.
Now let’s look at some examples of common layouts with path signals. All of these examples use right-hand drive for the trains.
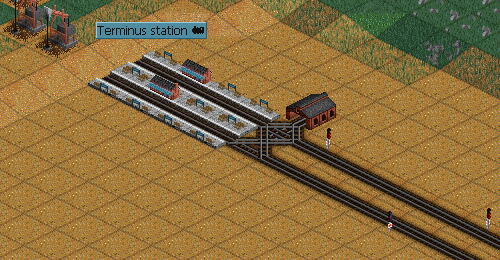
This is a terminus station, with one line connecting to it, and a train depot. Because it’s a terminus station, the points to select platform can be right next to the platform, no signal is needed between the platform and the points. There is a one-way path signal on the right-hand track going into the station area, which has a one-way path signal on it. This signal protects entry to the platforms and the depot.
When a train reaches the signal, it looks for a free platform, and gets green light if there is a platform free. If there are no platforms free, the signal stays red and the train stops. As soon as a train has entered a platform and is free of the switching points, another train will be able to pass the points, either to enter or to leave the station. Trains only go to the depot if they are ordered to go there.
This design is simple, compact, and good for moderate traffic.
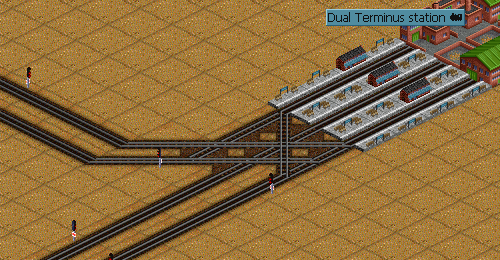
This is a terminus station, with two lines connecting to it. It works very much like the one above, but it’s larger and the switching area needs to take up more space. Trains can enter the station from the left and bottom lines at the same time, as long as they don’t need to cross.
The signal setup works the same way: Trains entering or leaving the station look for a free path to go where they want. If there is a free path, the signal turns green, and the train can pass. If the path is blocked, such as if all platforms are blocked, or another train is already leaving the same direction, the train waits for the other train to clear the switching area.
This design is also relatively simple and compact, but it does lose some capacity when several lines need to cross.
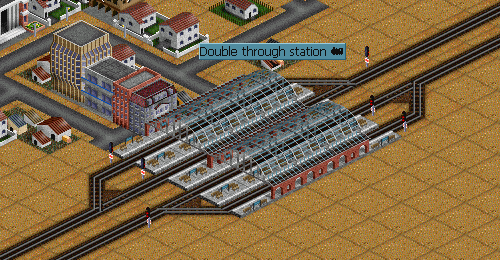
This is a through-station on a line, with two platforms per direction on the line. There are one-way path signals at the exit of each platform, and one-way path signals before the switching point to select which platform to use. The signals at the platform exit are needed as otherwise the first train to enter a platform would also block the path out of the station up to the next signal. The signal after the platform breaks this path and makes sure that trains waiting in the station will not block trains from leaving the station.
This station design lets one train enter a platform while another train is stopped or leaving the other platform in the same direction. That makes it efficient even for busy stations.
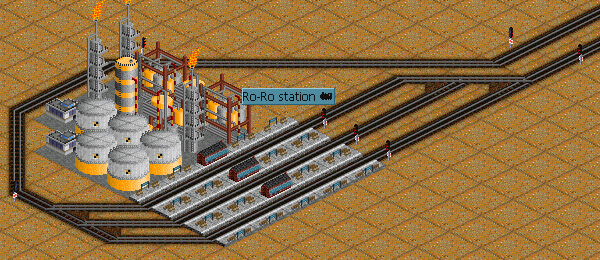
This is a roll-on/roll-off (ro-ro) station, with one line connecting to it. Trains entering the station come from the upper track on the right, drive around the industry, and then meet the one-way path signal protecting entry to the station platforms, on the bottom left. When there is a free platform, the train can begin entering that platform. As soon as an entering train clears the point turning in to the platform, another train will be able to select a different platform and begin entering that.
This design is much more efficient than a terminus station, when a lot of trains need to enter, load/unload, and then leave the same way.
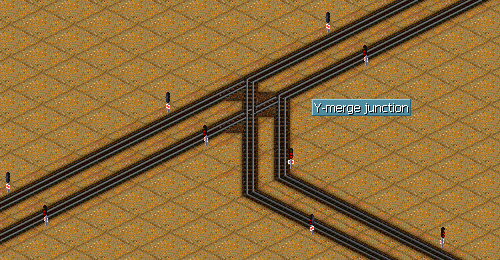
This is a flat Y-merge junction, merging two lines into one. Trains can pass each other at the junction, without stopping, as long as they don’t cross paths.
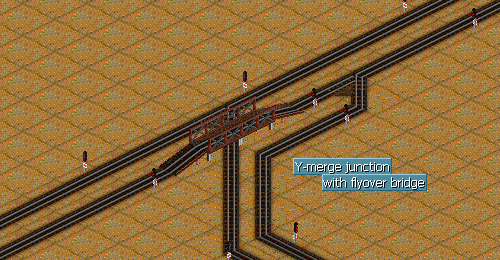
This is a good and simple design for moderate traffic. When the network gets busier, you may need to upgrade this with a bridge or a tunnel, for example like this:
These six examples can be uses as basis to build large train networks that will also be efficient. It’s also possible to extend them all with more tracks and such, as needed.